 | |
Knitting Box Woodworking Project Plan1. Mark position of dividers with a pencil outline on the inside divider piece of the knitting box (pattern divider). Use a right angle ruler to make sure they are straight. 2. Predrill the nail holes down the center of each divider position on the inside pattern divider. On the front side tap in the nails gently not going all the way through.  3. Stand one divider upright and run a line of glue along. Line up the first row of nails above the divider and hammer nails in. Repeat this process for the opposite side divider, then the middle divider.  4. Mark positions of all the dividers on the base, glue then nail. 5. Mark the attaching edges on sides, predrill holes, glue and nail as before. The sides, front and back will hang about 20mm lower than the bottom to create a recessed base for the top of the legs to fit up into and be hidden. 6. Use a nail punch to tidy surface. 7. Before attaching front and back, because the sides on a rake (angle), you have to match the angles by planing the edges. Mark the angle on the back and front pieces with a pencil and use a hand plane. 8. Glue and nail back and front on as before. When nailing front, remember to nail into divides as well.  9. Legs are simply two pieces of ply 170mm x 50mm nailed together. Make four of these and then cut two ply rails so the legs fit neatly in the corners with the rail inbetween across the box. Nail the rail inbetween the legs then screw through the rail into the base of the box. 10. Glue and nail the tray together as in the diagram. 11. Mark positions of wool threading holes in the front of the knitting box, in the lower region on the centre of the compartments, drill. 12. To prevent wool from getting caught on the ply get four small cotton spools. Cut one lip edge off, add some glue and stick into the holes. 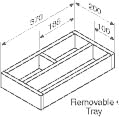 You can give your new knitting box a paint finish or varnish to suit your home and taste. For the project plan in the picture a simple white enamel gloss paint with a stenciled flower decoration was used. Woodworking Project Plan Materials:3mm plywood (bottom of removable tray) 15mm plywood 30mm nails 30mm screws PVA Glue 50mm Butt Hinges 4 small plastic cotton spools (to line the holes that thread the wool out) Woodworking Project ToolsHammer Saw Router Drill Hand Plane Right Angle Ruler Nail Punch | |